How to integrate Sequel with your own authentication
Introduction
Our previous post explained the power of Sequel components and how to get started. If you haven’t, go and check it out: https://www.sequel.io/blog-post/how-to-build-your-own-video-platform-with-live-streaming-and-webrtc-using-sequel
In this article we will focus on the authentication flow to ensure the best possible user experience. Most of our customers already have accounts or user login/sign-up flows and they want to prevent users from having to login twice. With Sequel, you can easily integrate with ANY login flow and automatically identify users when they load the component.
Before we get started, make sure you create a free developer account on our platform: https://admin.sequel.io/sign-up
How it Works
Once an event or a networking hub is created we generate a powerful iframe url to use the functionality in your own product. This url does not contain any user information and by default does not allow users to join the event without a JSON Web Token (JWT). The tokens are short-lived credentials that are signed with your application secret and contain grants that govern the actions the client holding the token is permitted to perform.
To generate a JWT you need to create a backend server that calls our API endpoints and generates the credentials when a user wants to join a specific session. The flow is explained below:
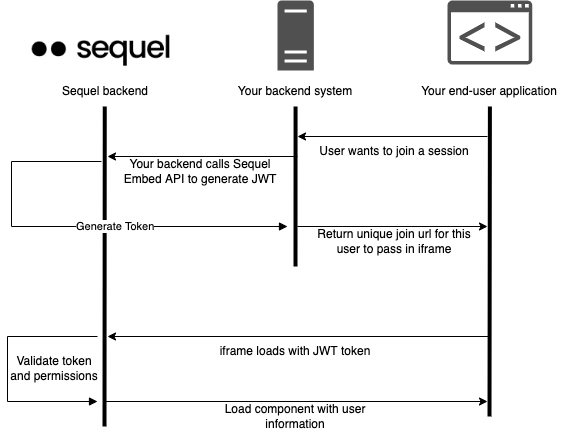
Generating a token
As shown in the diagram above, you need to call our Get Embed endpoint to generate the token before a user joins a session. The specs can be found here:
https://docs.introvoke.com/reference/getembedeventbyid
This endpoint requires a few fields to identify the user:
- userId – field to uniquely identify the user. We recommend passing your existing user id into this field. This could also contain the email or any values that will help you identify them in analytics.
- userName – field to display the name of the user
- userEmail – field to keep track of the user email. This is purely for analytics purposes to understand user engagement in the component.
- userAvatar – field to assign an avatar to the user. This can be blank to revert to gravatar.
- eventSpecific – flag to create the token specifically for this event. Setting to false will allow the same token to join other events from the same company. Make sure to set it to TRUE if you don’t want users to navigate to other sessions (for example paid sessions).
The post call will return a unique url for this user to join the session. The next step is to simply add the url in an iFrame:
The session will now contain the user information that was passed in the API call and it’s ready to be used. The default permission level is attendee and if you wish to elevate the permission to host, you can add the userId or userEmail in the presenters or organizers fields. This can be done at event creation or by using the update event API.
There is no need to regenerate the tokens if you add a user id or email to an event, we do that check when a user joins the session.
Alternative: Register a user
Another path to enable access is to use our registration flow. This is more specific to webinar style sessions where users have to register first. You can call the following endpoint to generate a registration:
https://docs.introvoke.com/reference/post_event-eventid-registrant
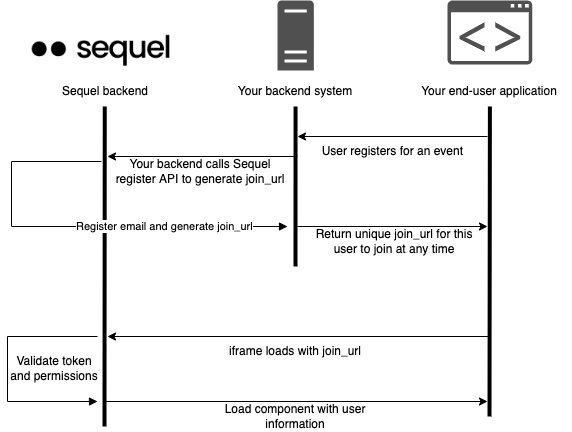
Depending on your scenario, you might want to register people for specific sessions before they can join them. In this flow the token will work only for this event and cannot be used to join other sessions even within the same company. If a user tries to join the session twice with the same token they will be kicked out, only one active session per email is allowed.
This endpoint requires a few fields to identify the user:
- name – field to display the name of the user
- email – field to keep track of the user email. The email must be unique, you cannot create two registrations with the same email ensuring the join url can be used by only one user.
- metadata – this is an open object that can contain any metadata you wish to pass. This is useful if you wish to keep metadata when fetching analytics. For example you can pass the user job title or company and it will be returned in the analytics endpoints as well.
The post call will return a unique join_url for this user to join the session. The next step is to simply add the url in an iFrame:
Same as above, the user will be joining as an attendee and you can add the user email in the presenters or organizers fields to elevate their permission.
Code example
To help you get started, we created a sample project that demonstrates the get embed endpoint to identify a user. This project is built using React and the live demo can be found here:
https://introvoke.github.io/sequel-react-quickstart/
Source code:
https://github.com/introvoke/sequel-react-quickstart
In this example we populate upcoming sessions based on your company and when a user clicks on a session we call the get embed endpoint to generate a token. For simplicity the values are hardcoded but you can change these based on your internal auth to correctly identify the user:
There is no need to store the JWT token if you use the embed code endpoint, you can call this as many times as you wish with the same credentials. If you use the registration endpoint you must store the join_url since we don’t allow registering the user twice with the same email.
Looking for more advanced integration? Maybe you wish to generate the token on your side to prevent API calls? Have a chat with our technical team and we can discuss your scenario.